Creating your own Christmas snow village is one of the most magical DIY projects you can do for the holidays—especially when everything comes from the dollar store. With just a few affordable pieces, you can build a charming, snowy display that looks straight out of a cozy winter movie.

This guide will walk you through easy, budget-friendly steps to build a snow village that feels whimsical, festive, and totally custom to your home.
Gather Your Dollar Store Supplies
Before you start designing your village layout, grab the basics. Most dollar stores carry everything you need in their holiday and craft aisles.
What to Look For
- Mini ceramic houses
- Small bottle brush trees
- LED tea lights
- Faux snow or cotton stuffing
- Wooden trays or foam boards
- Mini figurines like carolers, snowmen, and reindeer
- Hot glue sticks
- White paint for touch-ups
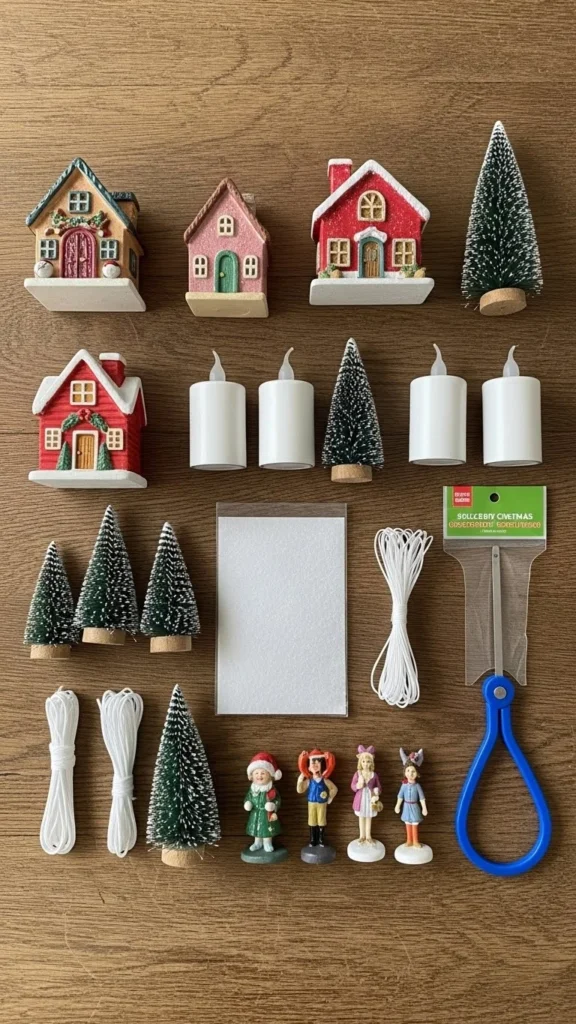
Starting with the right supplies makes the entire setup easy and fun.
Paint and Prep Your Mini Houses
Some dollar-store houses come pre-decorated, while others need a little love. Giving them a fresh coat of white or soft pastel paint can make them look expensive and cohesive.
Tips for a Clean Look
- Use matte white paint to get that snowy, ceramic finish.
- Add tiny gold or silver accents for charm.
- Dry brush some “frost” on the roofs with a hint of glitter.
- Let each house dry fully before assembling your scene.

This small step adds a polished, magical feel without costing more than a few dollars.
Build Your Village Base
A good base gives your snow village structure and height. A wooden tray, foam board, or shallow box can act as the perfect foundation.
How to Set Up the Base
- Cover your base with faux snow or cotton.
- Add height with upside-down bowls or foam blocks hidden under the snow.
- Keep a soft, wintery feel by smoothing edges and fluffing the snow.
- Test different layouts before gluing anything down.
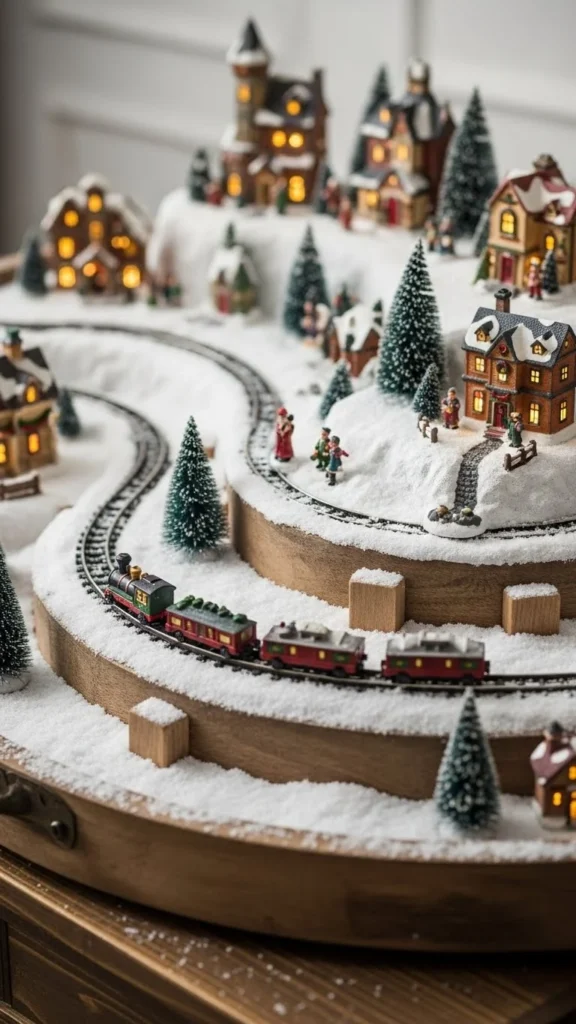
Varying heights make your village look more realistic and visually interesting.
Arrange Houses, Trees, and Figurines
Now the fun part—putting everything together! This is where your creativity shines.
Smart Arrangement Ideas
- Place bigger houses toward the back and smaller ones up front.
- Create winding “paths” by leaving small open spaces in the snow.
- Cluster trees in groups of two or three for a natural look.
- Add LED tea lights inside houses for a warm glow.
- Position figurines to tell a story: carolers by the door, kids playing, reindeer beside a snowy tree.
Take your time arranging and adjusting until the village feels balanced and inviting.
Add Finishing Touches for Extra Magic
A little sparkle goes a long way. These mini details help transform your snow village from cute to show-stopping.
Final Enhancements
- Sprinkle glittery snow over rooftops.
- Add tiny wreaths or bows to house doors.
- Use fairy lights around the base to brighten the scene.
- Paint small wooden beads to look like stepping stones.
- Add a mirror piece as a frozen “pond.”
Even the tiniest add-on can make a big visual difference.
Display Your Snow Village proudly
Once your snow village is complete, find a cozy spot to display it—your mantel, entry table, bookshelf, or even a windowsill.
Display Tips
- Place fairy lights around or underneath the display for a soft glow.
- Use a white runner or blanket underneath to extend the snowy look.
- Surround with candles (battery-powered for safety).
- Add a garland behind or above for a layered holiday feel.
Your snow village becomes an instant conversation piece and a warm, festive greeting for anyone who enters your home.
Final Thoughts
Creating a DIY Christmas snow village using dollar-store items is affordable, relaxing, and incredibly rewarding. You don’t need fancy materials—just creativity and a bit of imagination. Each tiny detail you add helps bring your winter wonderland to life.
Save this idea for later and build your magical snow village this holiday season!