If you want an easy, charming Christmas craft that instantly warms up any corner of your home, yarn trees are the perfect project. These fluffy, textural decorations look beautiful on mantels, shelves, entryway tables, or even as a centerpiece. Plus, they’re beginner-friendly and budget-friendly—no complicated tools required.
Let’s walk through how to make your own, along with tips to style them so they feel like boutique-quality holiday décor.
What You Need to Get Started
Before you dive into crafting, gather a few simple supplies. Most can be picked up at craft stores or dollar shops.
- Foam or cardboard cones (any size)
- Yarn in varying textures—chunky, wool, boucle, or soft acrylic
- Hot glue gun and glue sticks
- Scissors
- Optional décor: mini pom-poms, wooden stars, felt cutouts, faux snow, small bells, fairy lights
Using different types of yarn is the secret to creating visual variety between your trees. Chunky yarn gives a cozy knit look, while thin yarn wraps more densely for a clean, modern finish.

Step 1: Choose the Shape and Size of Your Trees
Tree cones come in many sizes—from tiny 4-inch minis to tall 15-inch statement pieces. Mixing heights makes your final display feel layered and intentional.
Start by deciding where your trees will sit:
- Mantels look best with medium and tall cones.
- Bookshelves look great with mini or slim trees.
- Console tables benefit from a mix of tall and short heights.
If you’re on a tight budget, make your own cones by rolling poster board into a cone shape and taping the seam. They work just as well once wrapped in yarn.
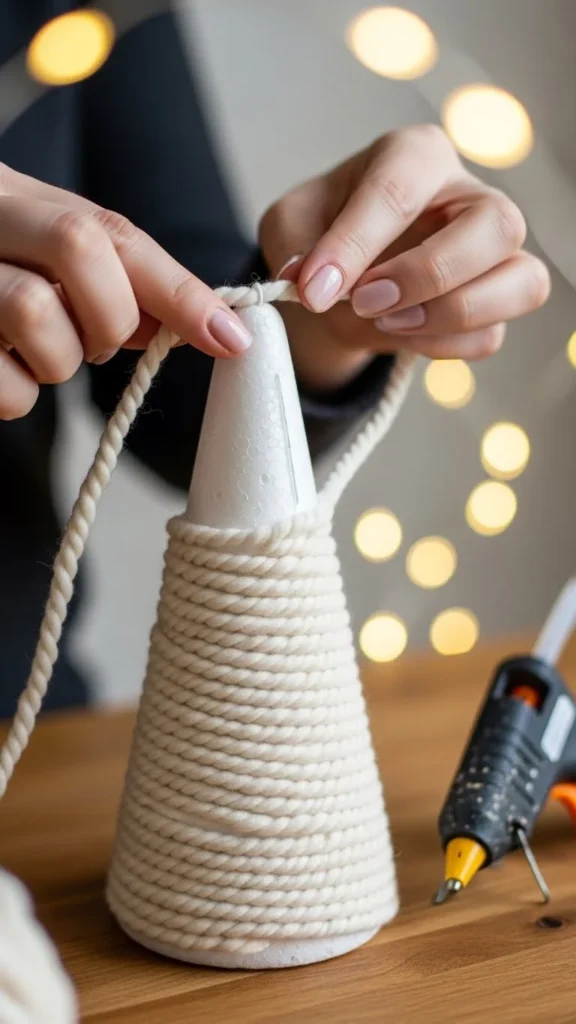
Step 2: Wrap the Yarn Around the Cone
This is the relaxing, almost meditative part of the craft.
- Add a small dot of hot glue at the tip of the cone.
- Press the end of your yarn into the glue and hold for a few seconds.
- Slowly wrap the yarn around the cone, working downward in tight circles.
- Push the yarn snugly together as you wrap so no gaps peek through.
- When you reach the bottom, trim the yarn and secure with another glue dot.
For chunkier yarns, you’ll notice the tree builds its texture quickly. For thin yarns, take your time and wrap slowly so the layers look even.
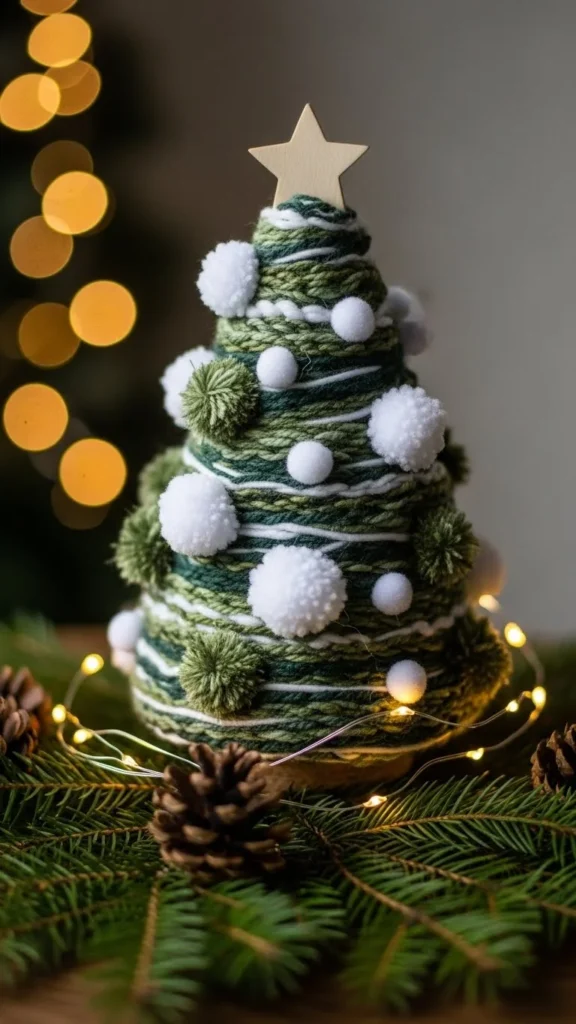
Step 3: Add Cute Embellishments (Optional but Recommended!)
This is where your tree transforms from simple to stunning.
Try adding:
- Mini pom-poms as ornaments
- Twine bows for a rustic look
- Felt stars glued to the top
- Wooden beads spaced evenly for a Scandinavian vibe
- Faux snow lightly dusted on the branches
Keep your color palette cohesive—neutrals, greens, and soft metallics tend to look the most high-end.
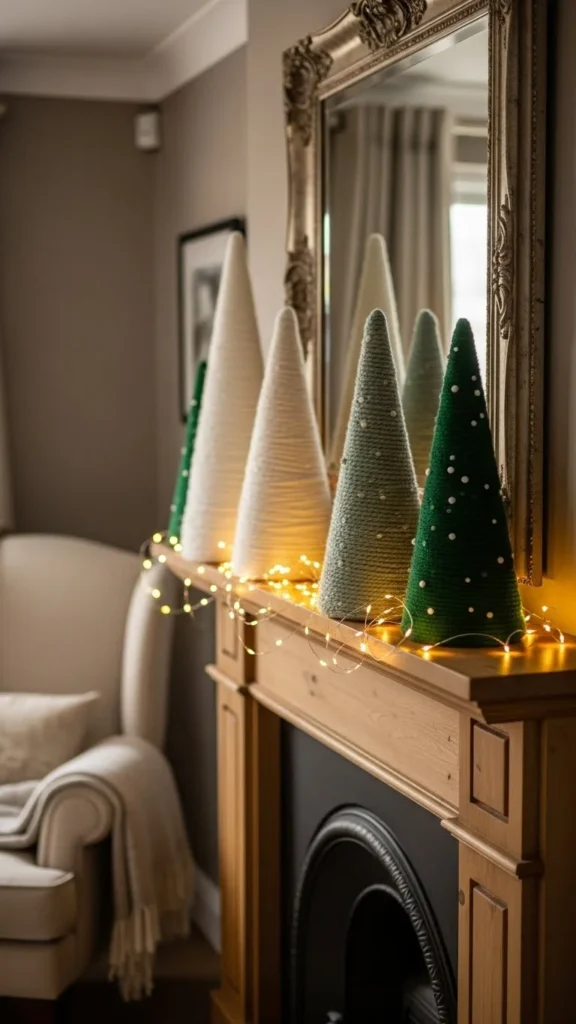
Step 4: Style Your Yarn Trees Like a Pro
Once your trees are made, it’s time to display them! Here’s how to get that Pinterest-perfect look:
Group in Odd Numbers
Sets of 3 or 5 always appear more natural and balanced.
Mix Heights and Textures
Pair a chunky yarn tree with a smooth one for instant visual interest.
Use a Tray or Riser
Place your trees on a wooden tray, cake stand, or stack of books to elevate the arrangement.
Add Soft Lighting
Twinkling fairy lights or LED candles around the trees boost the cozy factor.
Layer with Seasonal Items
Sprinkle faux snow, pine branches, or cinnamon sticks around the base for a wintery finish.
Step 5: Try Variations for Unique Designs
Once you’ve mastered the basic yarn tree, go wild with creativity:
Striped Trees
Alternate two yarn colors as you wrap for a striped effect—think cream and sage or gold and white.
Twisted Texture Trees
Twist two different yarns together before wrapping for a braided, dimensional look.
Boucle Trees
Boucle yarn instantly creates a soft, cloud-like texture that feels luxe and modern.
Mini Tree Ornaments
Make 2–3-inch mini cones and attach strings to hang them on your Christmas tree.
Muted Color Palettes
Soft neutrals like oat, cocoa, and cream make excellent farmhouse-style décor.
Step 6: Display Ideas for Every Room
Here are creative ways to use your finished trees throughout your home:
- Mantel Display: Pair with stockings, candles, and garland for a classic Christmas scene.
- Bookshelf Styling: Mix trees with books, picture frames, and small signs.
- Entryway Table: Add a cluster of trees beside a bowl of pinecones.
- Dining Centerpiece: Arrange yarn trees on a long tray with greenery.
- Bedroom Decor: Place a couple on your nightstand for soft holiday charm.
Changing the tree colors helps you match any theme—blush pink for whimsical décor, deep green for traditional settings, or white-on-white for a Scandinavian winter look.
Final Touches and Storage Tips
To keep your yarn trees looking fresh:
- Store them in a dry place.
- Wrap them in tissue paper to avoid dust sticking to the yarn.
- Keep them upright to maintain their shape.
These little trees last for years, so they’re well worth the tiny investment of time.
Wrap-Up
DIY Christmas yarn trees are one of the easiest and most rewarding holiday crafts you can make. They’re soft, charming, customizable, and perfect for mantels, shelves, and tabletops. Plus, they’re so fun to create that you may find yourself making a whole forest!
Save this craft for later and start building your cozy Christmas collection today!